Unfortunately,
they didn't list gloves to fit me. I downloaded a hand size chart and I
am a XXXL or size 13.5, whatever the .5 means.
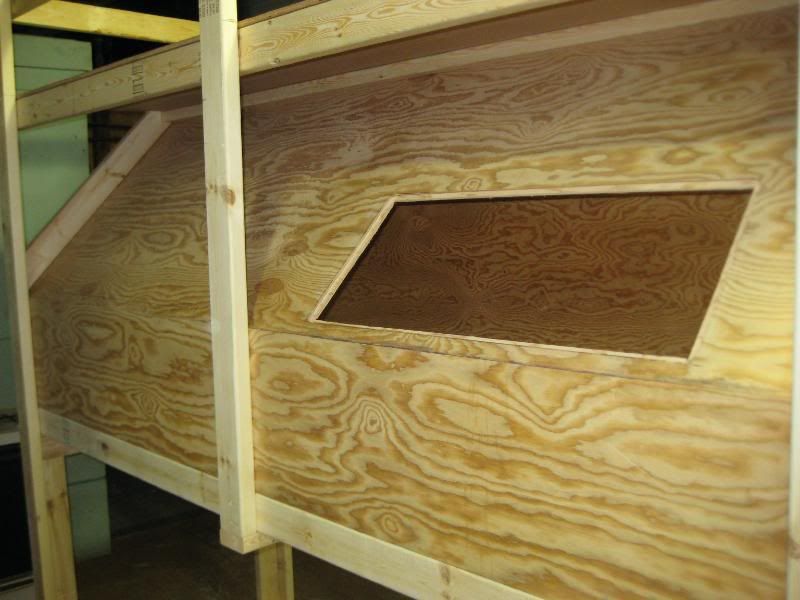
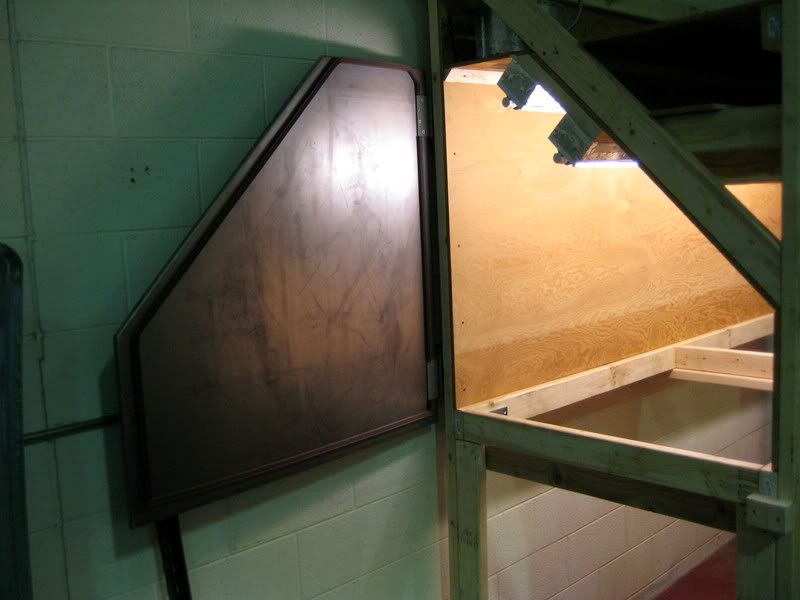
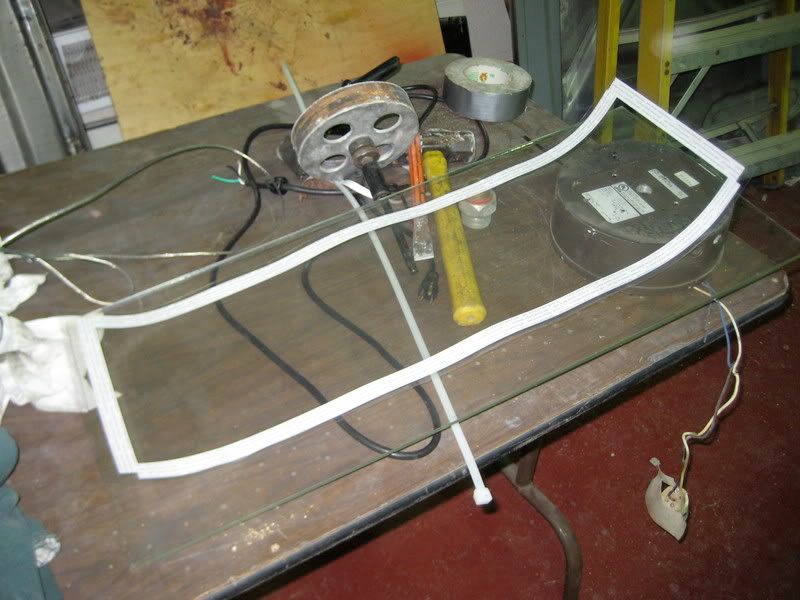
Today I cut the window openings. I've saved tempered glass lenses for commercial light fixtures. These were off of some 1000-watt mercury vapor floodlights that were enormous by today's standards. The lenses are 14" x 33" and are 1/4" thick.
I laid them on the angled face and positioned them with screws around the edges. I drew a line around their perimeter. I removed the glass and used my circular saw to cut an opening 1/2" smaller, all the way around. Using a rabbit to creating a 5/8" wide by 1/4" deep recess, so the glass can sit flush. I'll hold it in place with storm window clips. I used a 3/16" router bit to square up the corners to match the glass.
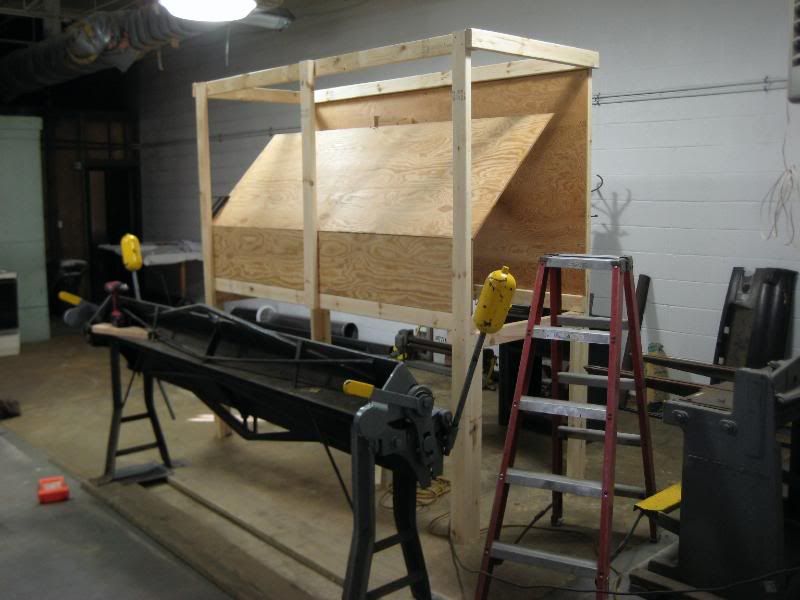
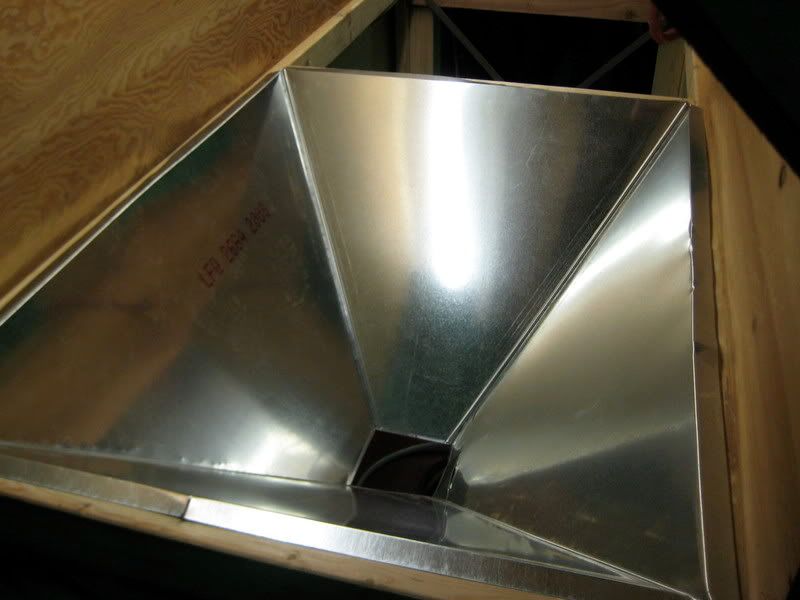
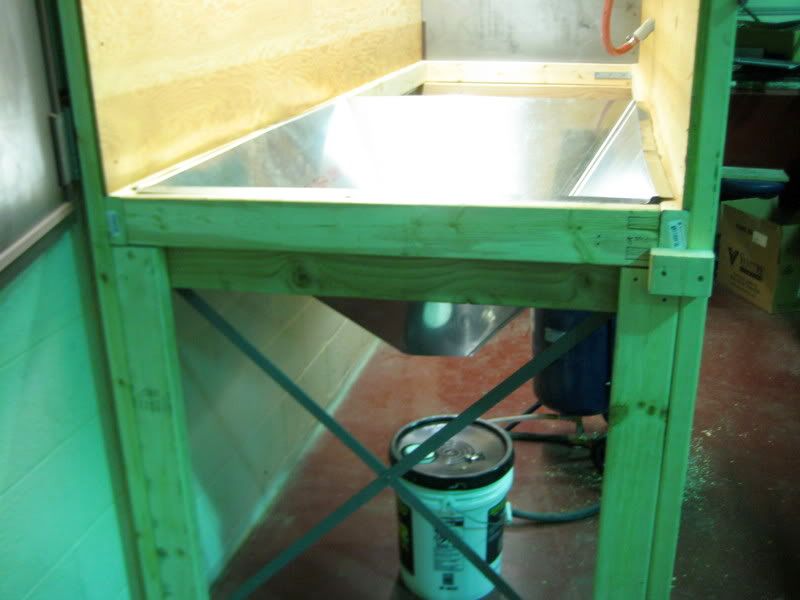
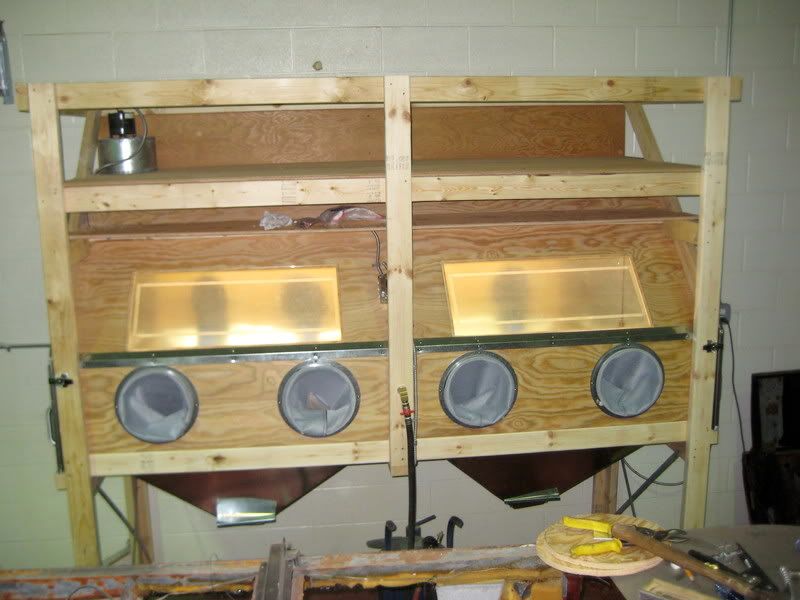
I decided to make two return funnels instead of one. This allowed the sides to be at a steeper angle on the sides. A single funnel 8 feet wide would have trapped a lot of material on its surface. Adding the center support significantly stabilized the structure.
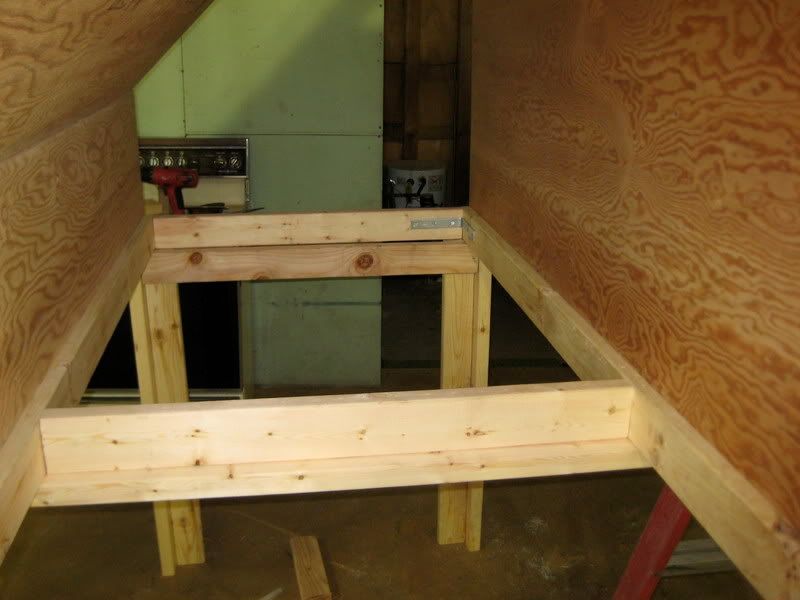
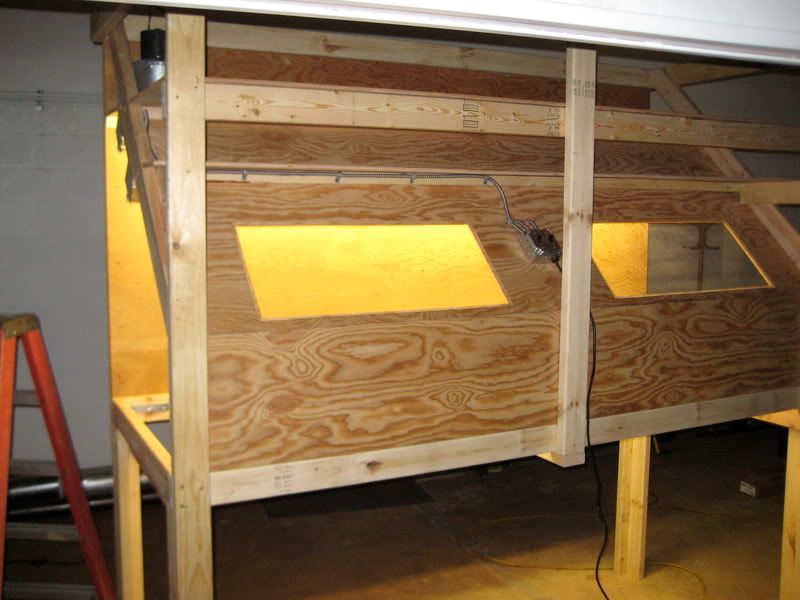
I installed the rest of the full depth shelf at the top of the chamber and installed a shallower shelf right above the windows. I installed some spacers on the inside of the chamber so that the high-output fixtures can breath. The manufacturer recommends that there be 6" of air space above but that distance won't be necessary with the amount of air circulating through this chamber. The fan will be on the same switch as the lights. so the fixtures will always be ventilated while in use.
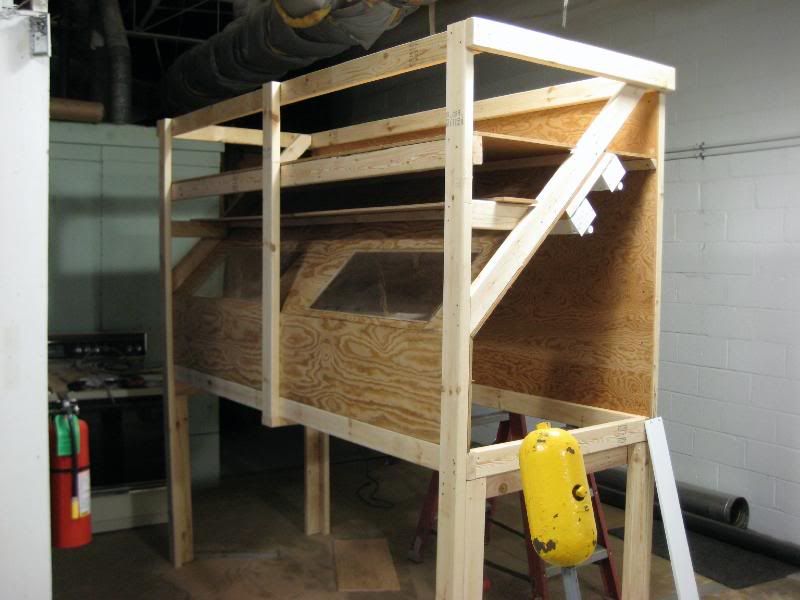
The top of the framework will get some horizontal bracing and another layer of shelving. I've had to give up some storage space to put this monster in my shop but the extra shelving makes up for the loss.
 Senior Member
I used tow double pole switches to control the lights and the fan. The way I wired it the fan will come on with either light. I used metal jacketed cable that should withstand years of deflected particles hitting it.
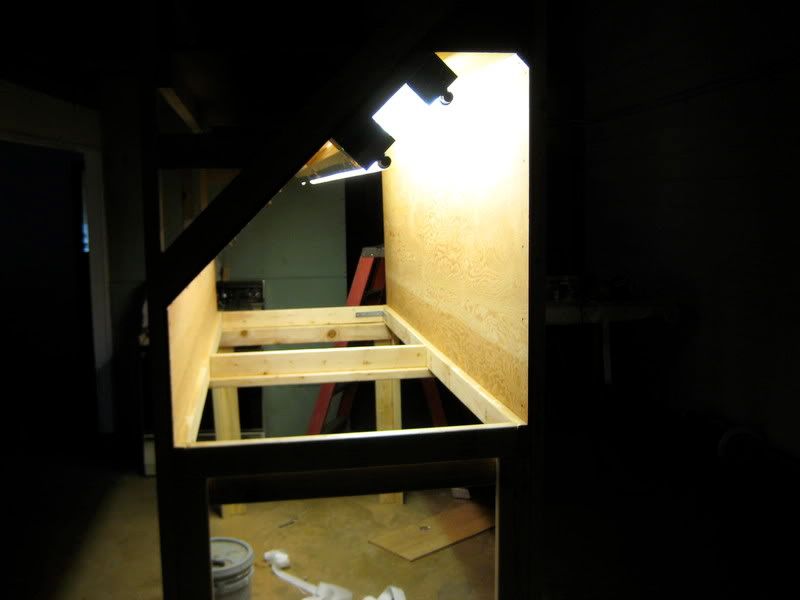
With the lights in the room turned off you can see how intensely bright 2 HO lamps really are!
Next, I'll be building the doors. I may fab those out of metal.
I've seen a number of home-made blast cabinets made from plywood and that's the route I chose. The materials were inexpensive and woodworking is a skill set that I still need to exercise every once in a while. My HVAC guy will be making the funnel so my work is just in wood.
I wanted to avoid the pitfalls of a suction feed sand blast rig so I've opted to use my pressure vessel blaster, which will fit neatly under the cabinet. I'll leave the bottom of the funnel open with a 5 gallon pail underneath the opening. On top of the rail that the funnel attaches to will be a grate that's 36" x 96". I havent decided what material to use. Expanded metal is cheap, but weak. Actual grating would probably work better, but be heavier. It'll be stationary, so that won't matter.
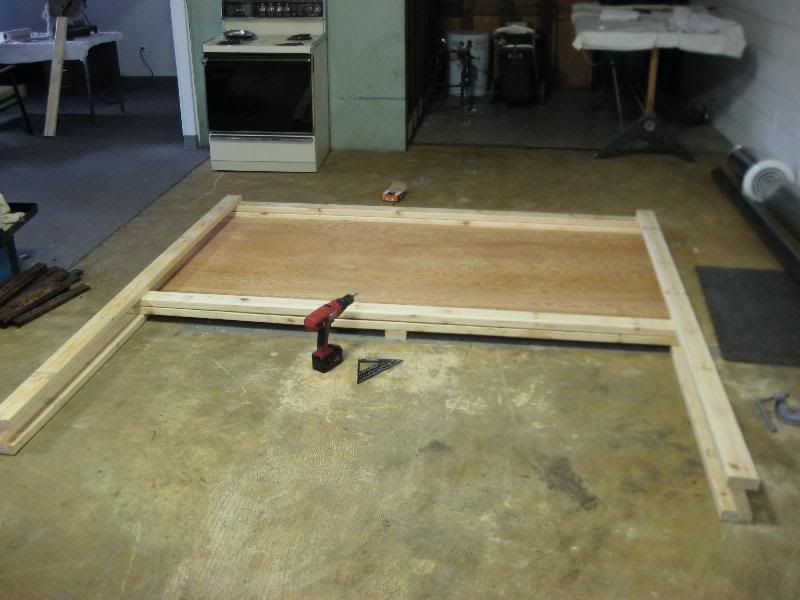
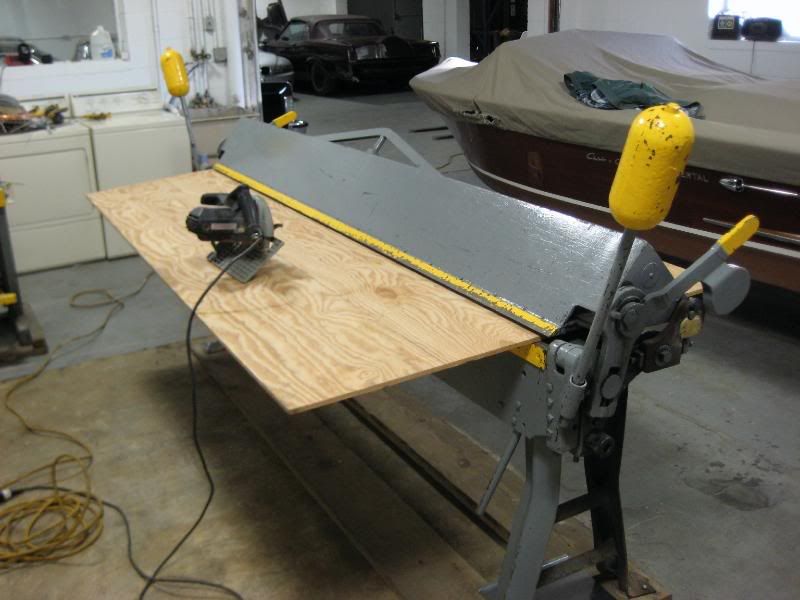
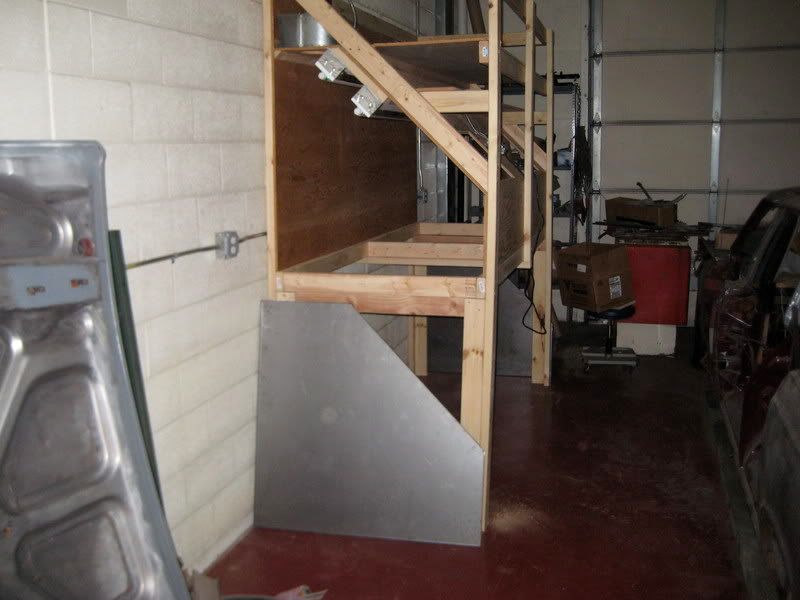
The object of this project was to do the least amount of cutting so I used standard measurement materials. The housing is made of vintage G2S 1/2" plywood that I've had lying around since 1999.
I used full 8' 2x4s for the uprights and horizontal braces. Using a full sheet of plywood allowed me to make the cabinet perfectly square.

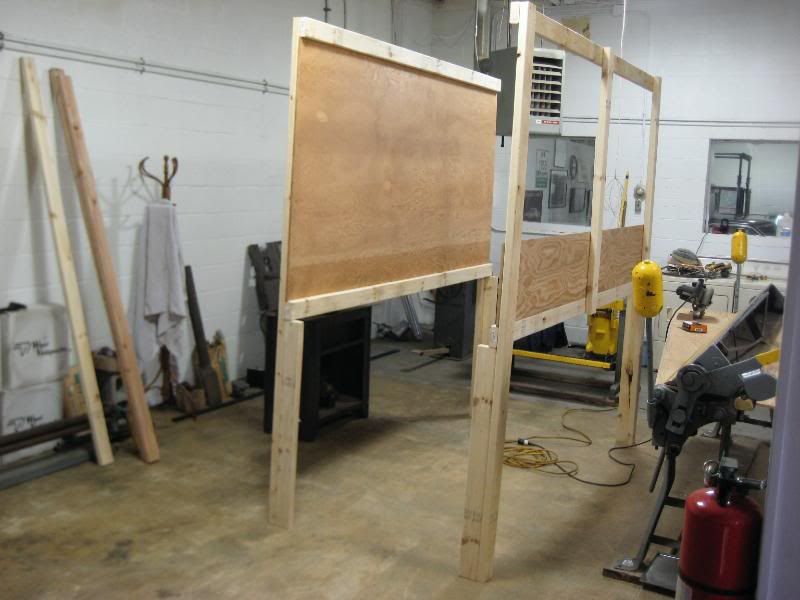
This use of lumber makes for taller legs than normal, but could easily be trimmed to match the user. I used the squared up back panel to precisely make a matching front assembly.
Using the remaining pieces from the center uprights and cutting two new ones I made the legs stronger by adding a corner support.
The brake made a handy plywood holder as I cut a beveled 14" piece to serve as the front panel.
Front and rear panels standing on their own.
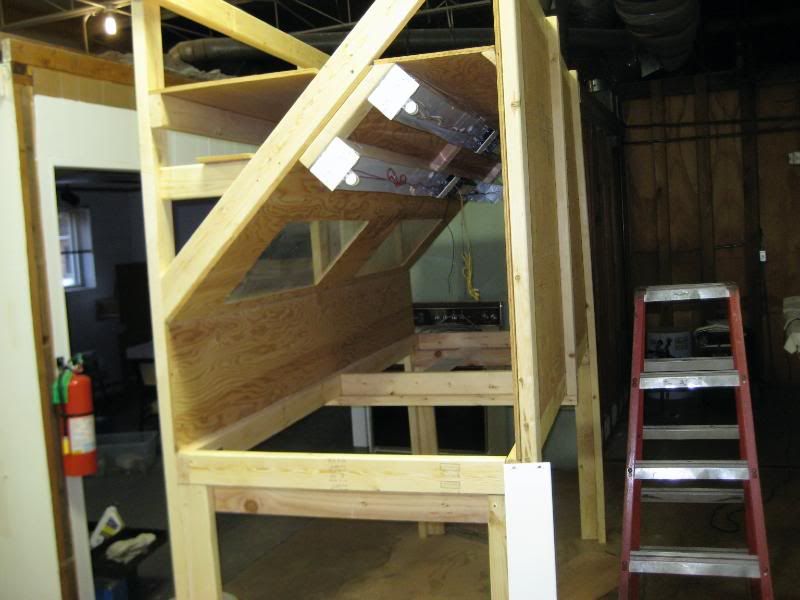
The rest of the space above the window area will be shelved to house all of the things associated with sand blasting. There will be 4 F96T-12/HO lamps in the ceiling of the booth on two switches for adjustable light levels.
More to progress pictures to come.

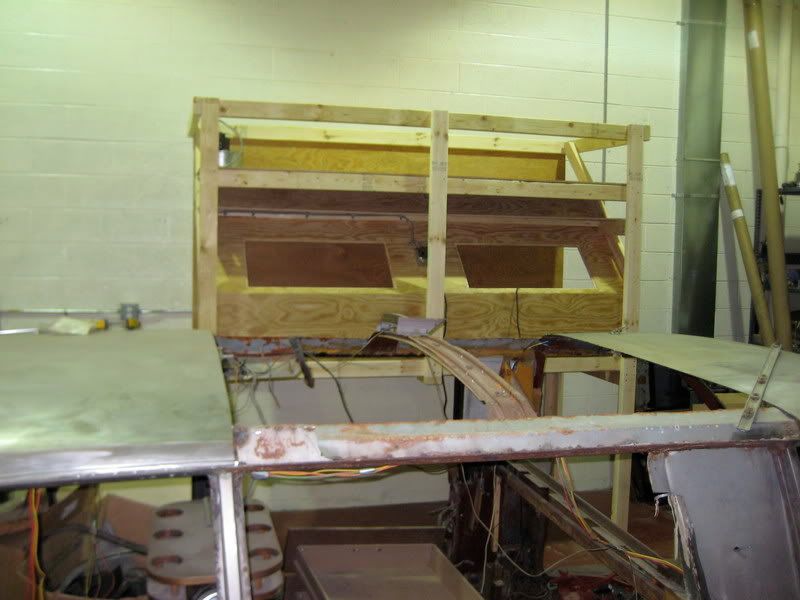
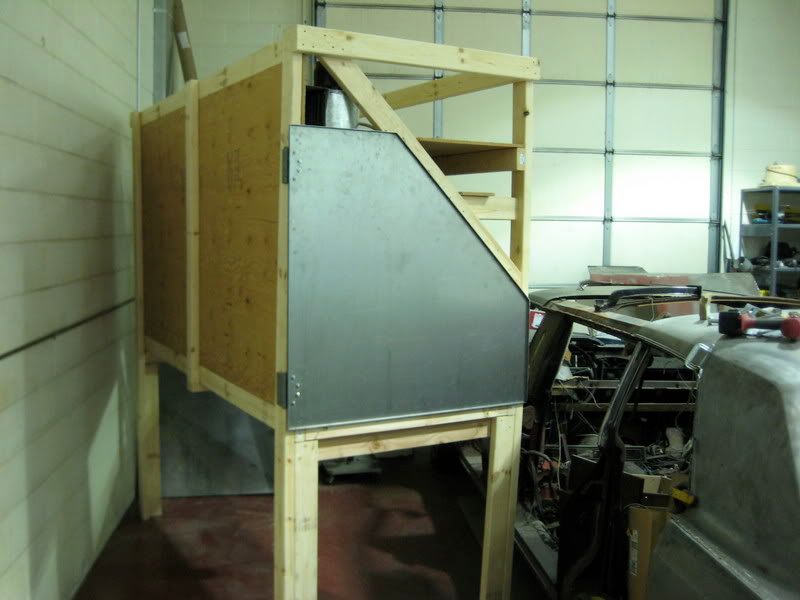
I built the cabinet in the building next door where I am setting up one of the front offices as a wood shop. I picked it up with the hi-lo and moved it into my shop. It's huge.
I considered making the doors out of wood but discovered that plywood would not lay flat enough to keep a tight seal against escaping dust and sand. I then considered making my own doors out of steel but soon realized that the 10 foot brake is not a box brake. I wouldn't have been able to bend the tabs at the edges, necessary for stability. I had mirror image doors fabricated out of 14 gauge steel. They have been, by far, the biggest expense in this build. I had all the lumber except 18 8' 2x4s. I had the fixtures and the lamps. I also had the tempered glass windows and the ventilation fan. I had the switches and the electrical supplies and all the fasteners. So far, I have about $300 in it. $260 of it was for the doors. They did do a nice job, though. No sharp edges and welded and rounded corners.
I had some commercial door hinges with bearings. The sand should play havoc with them but they're cheap to replace.
I spaced the door far enough out to take a compressible EPDM gasket that will help keep sand in the cabinet. No sense in painting the insides of these.
Senior Member
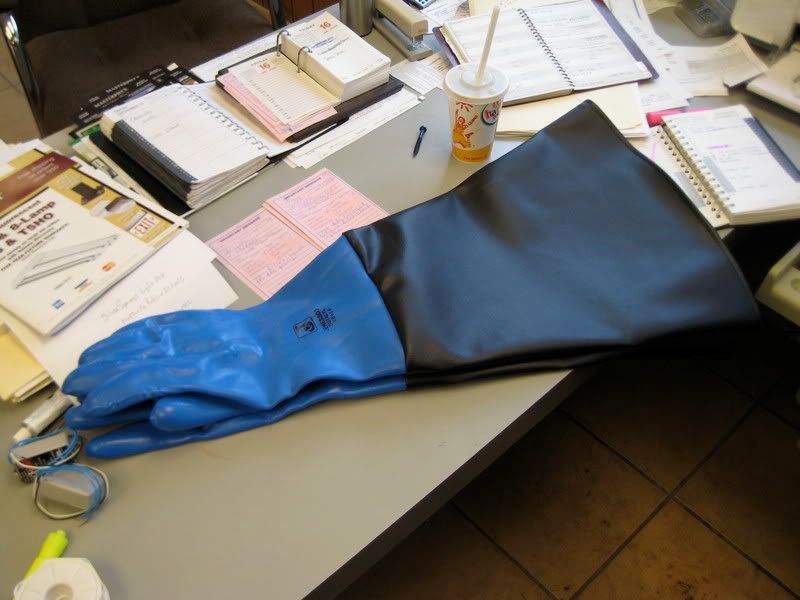
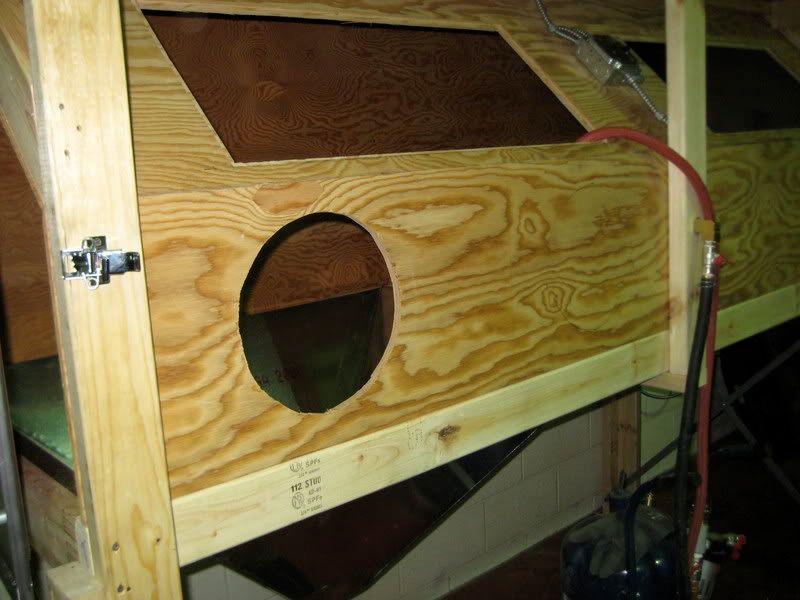
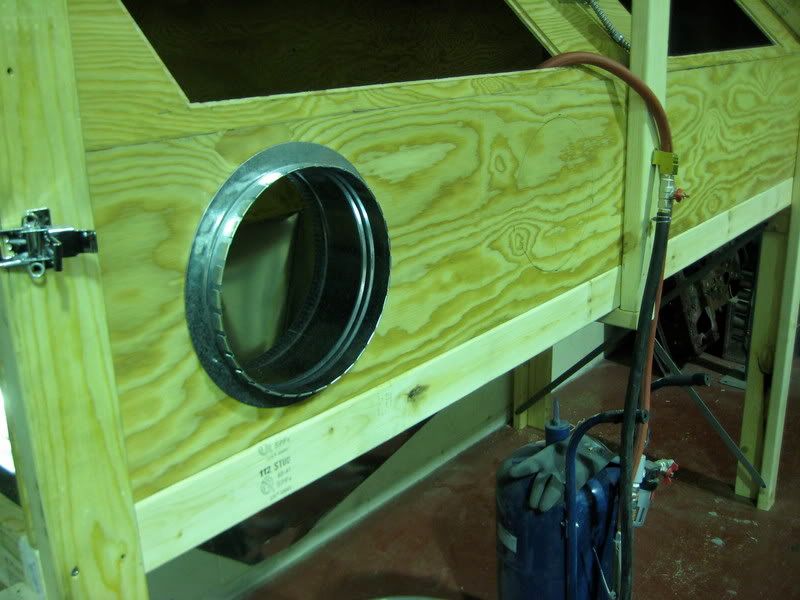
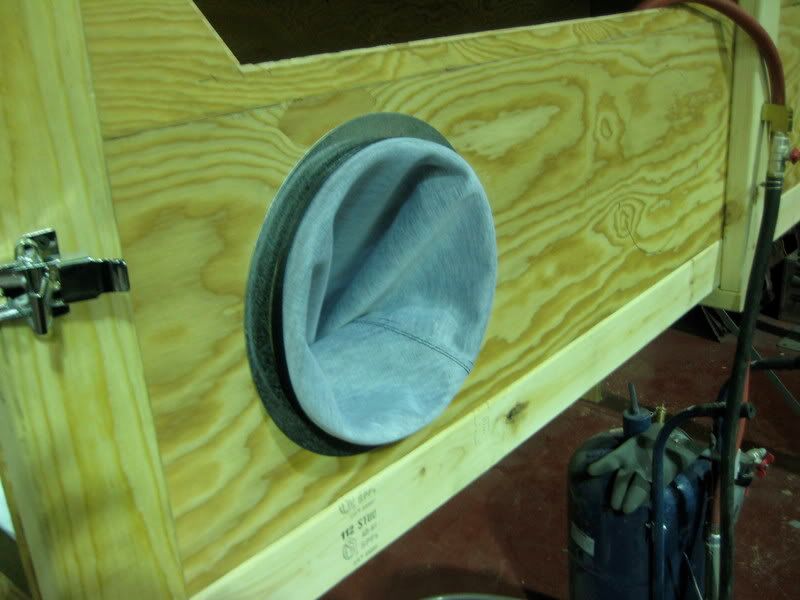
Most sand blast cabinets I've seen have 6" portals. The commercial gloves are designed for 10" diameter portals. They fit perfectly on a 10" ductwork take-off. I positioned them where they are comfortable for me. I simply held a pencil in each hand at a comfortable height to mark the center. They're about 8" further apart than a standard blast booth. Since my shoulders are 24" across I now understand why it was so uncomfortable and awkward to use a standard cabinet.
Added some handles for the side doors. They sit on rests to keep the doors aligned and need to be lifted slightly, so leftover handles from another project fit the bill.
My tinknocker friend came by and built the funnels and bent a flange for the back wall metal.
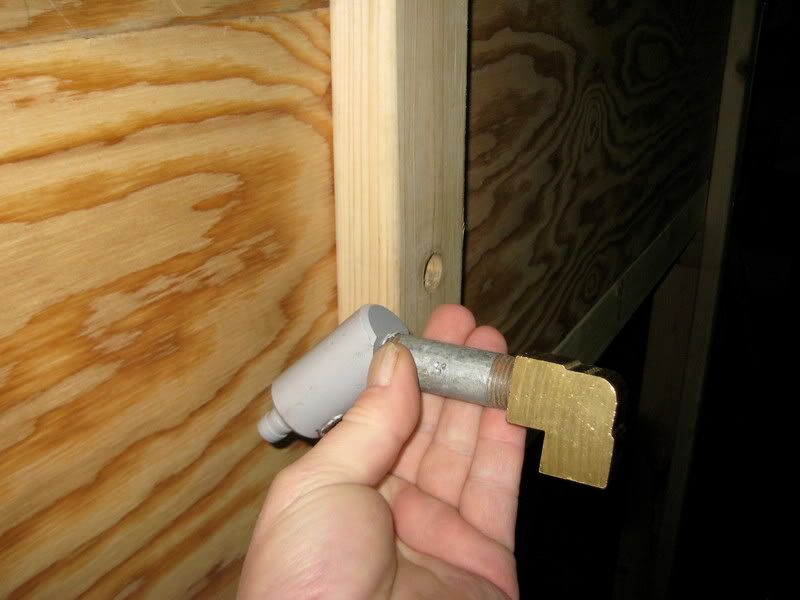
I needed a means to get the sand from the pressure pot to the blast chamber. I had some fittings left over from the soda-blast conversion so I devised a bulkhead fitting the would get the sand where I want it. By passing it through the wall in the center I can use it in either bay. The fitting swivels as it passes through the wall so there will be more flexibility. I used reinforced 1/2" heater hose on the inside of the booth. By loosenng two clamps I can return the blaster nozzle to the tank when I want to use it outdoors. That's not going to happen any time soon as it was -10° yesterday.
I installed a shut off so that I can quickly shut off the blast nozzle if a hose ruptures or comes loose.


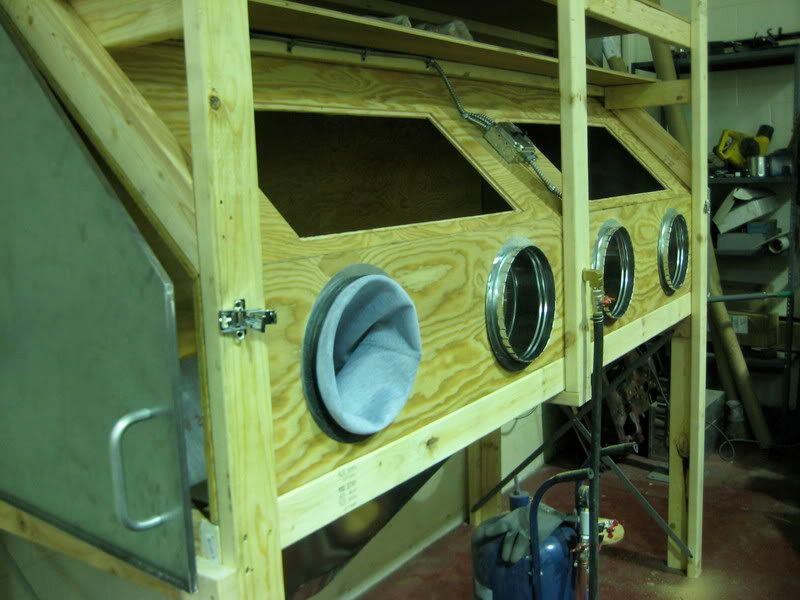
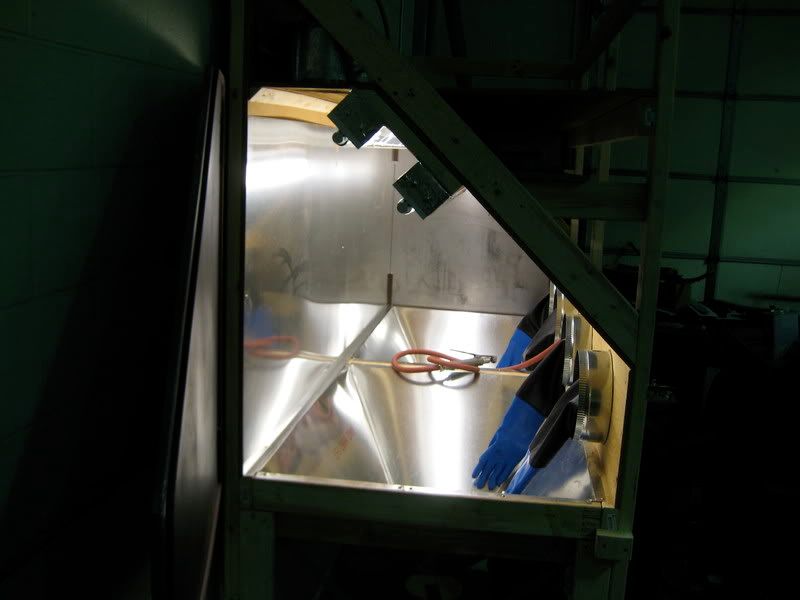
Gloves, funnels and back wall metal installed.
Sacrificial mylar sheet. It attaches with double stick tape. Prevents etching tempered glass window. Simple to peel and replace.
It's pretty close to complete. All that's left to do is the grating above the funnels and hooking up the ventilation.
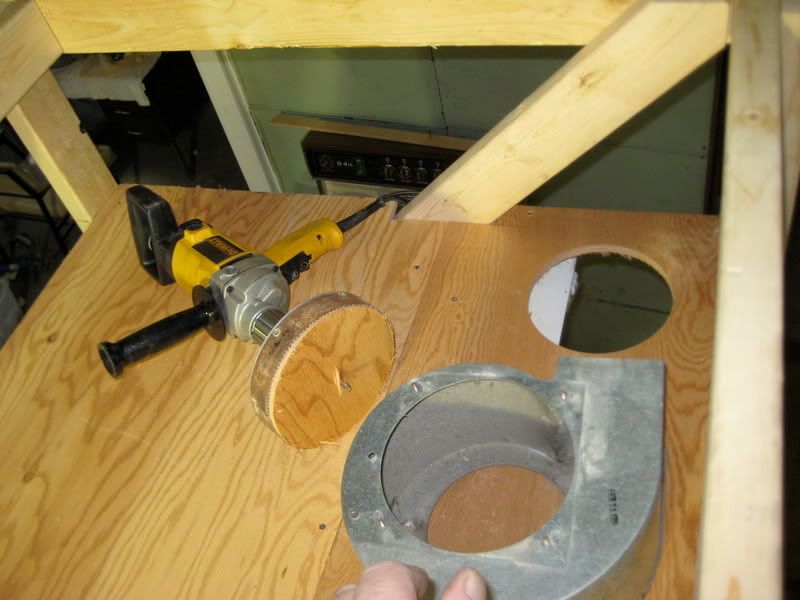
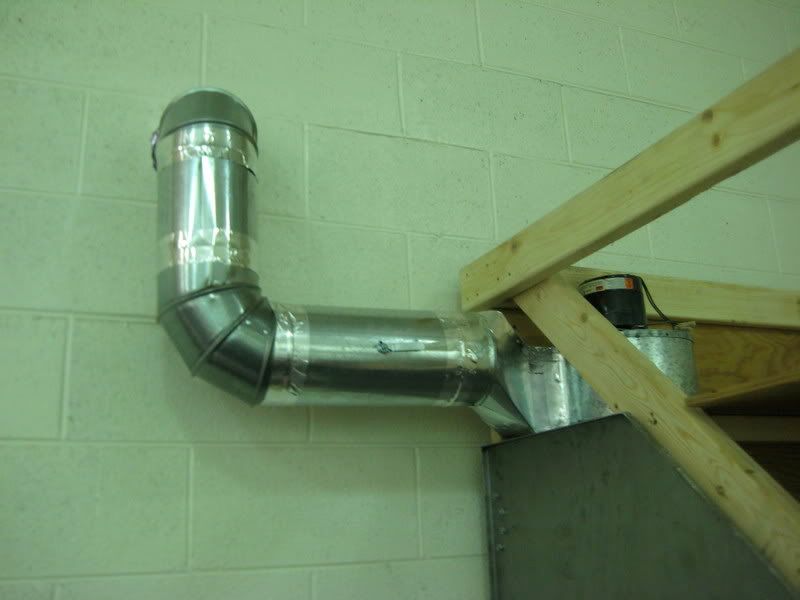
I have a diamond grit hole saw that I use for installing recessed lighting in plaster ceilings. It's 6 3/8" diameter, perfect size for 6" ductwork. The outlet of the fan motor is 4" x 6" or 24 square inches. I'll modify a 6" ductwork boot to transition to 6"round. I picked a position in the 12" thick block wall where I would only have to cut through one of the webs. I drilled a 1/4" pilot hole and drilled until the saw bottomed out.
By adjusting the dampers at the bottom of each funnel there is a significant updraft of fresh air coming through the openings. This updraft carries huge amounts of dust out of the building leaving me with only larger particles of paint and debris to filter out of the media after it falls into retrieval bins below.
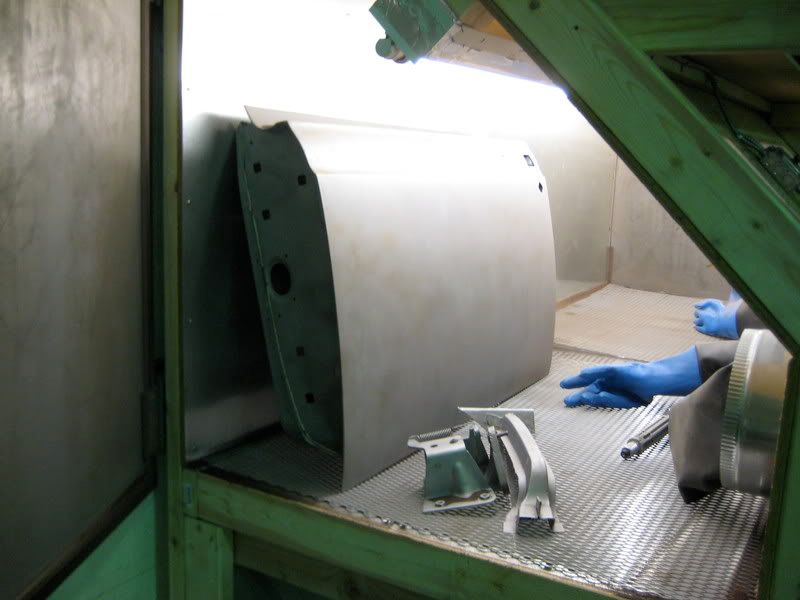
The booth is large enough to easily sandblast one of the huge doors off of my Lincoln limo. The beautiful thing about an 8-foot sand blast booth is that I can blast the ends of the doors by simply sliding them over to gain access.
Anyone that has a siphon feed sand blast rig would quickly convert it to pressure feed if they saw how fast rust and paint is stripped off of metal. The only thing left to do is find an appropriate drying system so that moisture doesn't clump up the media.
Total cost, under $500. Ability to blast metal clean without bothering my friends to use their equipment, priceless.
Today I cut the window openings. I've saved tempered glass lenses for commercial light fixtures. These were off of some 1000-watt mercury vapor floodlights that were enormous by today's standards. The lenses are 14" x 33" and are 1/4" thick.
I laid them on the angled face and positioned them with screws around the edges. I drew a line around their perimeter. I removed the glass and used my circular saw to cut an opening 1/2" smaller, all the way around. Using a rabbit to creating a 5/8" wide by 1/4" deep recess, so the glass can sit flush. I'll hold it in place with storm window clips. I used a 3/16" router bit to square up the corners to match the glass.
I decided to make two return funnels instead of one. This allowed the sides to be at a steeper angle on the sides. A single funnel 8 feet wide would have trapped a lot of material on its surface. Adding the center support significantly stabilized the structure.
I installed the rest of the full depth shelf at the top of the chamber and installed a shallower shelf right above the windows. I installed some spacers on the inside of the chamber so that the high-output fixtures can breath. The manufacturer recommends that there be 6" of air space above but that distance won't be necessary with the amount of air circulating through this chamber. The fan will be on the same switch as the lights. so the fixtures will always be ventilated while in use.
The top of the framework will get some horizontal bracing and another layer of shelving. I've had to give up some storage space to put this monster in my shop but the extra shelving makes up for the loss.
 Reply With Quote
January 1st, 2009 #16
- Join Date
- Jun 2003
- Location
- Farmington Hills, MI
- Posts
- 1,578
Re: Really big sand blast booth
I used a 7" hole saw to cut a hole in the top of the cabinet to mount the squirrel cage blower. I secured the blower housing directly to the top of the blast cabinet. This will draw air across the high-output fixtures, keeping them cool.I used tow double pole switches to control the lights and the fan. The way I wired it the fan will come on with either light. I used metal jacketed cable that should withstand years of deflected particles hitting it.
With the lights in the room turned off you can see how intensely bright 2 HO lamps really are!
Next, I'll be building the doors. I may fab those out of metal.
I've seen a number of home-made blast cabinets made from plywood and that's the route I chose. The materials were inexpensive and woodworking is a skill set that I still need to exercise every once in a while. My HVAC guy will be making the funnel so my work is just in wood.
I wanted to avoid the pitfalls of a suction feed sand blast rig so I've opted to use my pressure vessel blaster, which will fit neatly under the cabinet. I'll leave the bottom of the funnel open with a 5 gallon pail underneath the opening. On top of the rail that the funnel attaches to will be a grate that's 36" x 96". I havent decided what material to use. Expanded metal is cheap, but weak. Actual grating would probably work better, but be heavier. It'll be stationary, so that won't matter.
The object of this project was to do the least amount of cutting so I used standard measurement materials. The housing is made of vintage G2S 1/2" plywood that I've had lying around since 1999.
I used full 8' 2x4s for the uprights and horizontal braces. Using a full sheet of plywood allowed me to make the cabinet perfectly square.
This use of lumber makes for taller legs than normal, but could easily be trimmed to match the user. I used the squared up back panel to precisely make a matching front assembly.
Using the remaining pieces from the center uprights and cutting two new ones I made the legs stronger by adding a corner support.
The brake made a handy plywood holder as I cut a beveled 14" piece to serve as the front panel.
Front and rear panels standing on their own.
The rest of the space above the window area will be shelved to house all of the things associated with sand blasting. There will be 4 F96T-12/HO lamps in the ceiling of the booth on two switches for adjustable light levels.
More to progress pictures to come.
I built the cabinet in the building next door where I am setting up one of the front offices as a wood shop. I picked it up with the hi-lo and moved it into my shop. It's huge.
I considered making the doors out of wood but discovered that plywood would not lay flat enough to keep a tight seal against escaping dust and sand. I then considered making my own doors out of steel but soon realized that the 10 foot brake is not a box brake. I wouldn't have been able to bend the tabs at the edges, necessary for stability. I had mirror image doors fabricated out of 14 gauge steel. They have been, by far, the biggest expense in this build. I had all the lumber except 18 8' 2x4s. I had the fixtures and the lamps. I also had the tempered glass windows and the ventilation fan. I had the switches and the electrical supplies and all the fasteners. So far, I have about $300 in it. $260 of it was for the doors. They did do a nice job, though. No sharp edges and welded and rounded corners.
I had some commercial door hinges with bearings. The sand should play havoc with them but they're cheap to replace.
I spaced the door far enough out to take a compressible EPDM gasket that will help keep sand in the cabinet. No sense in painting the insides of these.
January 17th, 2009 #28
- Join Date
- Jun 2003
- Location
- Farmington Hills, MI
- Posts
- 1,578
Re: Really big sand blast booth
The largest gloves I could find are not big enough. They are a size 12 1/2. The fingers are plenty long. I just can't bend my fingers very comfortably. The manufacturer is getting some gloves in that are "ambidextrous" and have room for bigger fingers. Told me to keep these. I figured I'd try to stretch them out. Until he sends the new ones I'll suffer.Most sand blast cabinets I've seen have 6" portals. The commercial gloves are designed for 10" diameter portals. They fit perfectly on a 10" ductwork take-off. I positioned them where they are comfortable for me. I simply held a pencil in each hand at a comfortable height to mark the center. They're about 8" further apart than a standard blast booth. Since my shoulders are 24" across I now understand why it was so uncomfortable and awkward to use a standard cabinet.
Added some handles for the side doors. They sit on rests to keep the doors aligned and need to be lifted slightly, so leftover handles from another project fit the bill.
My tinknocker friend came by and built the funnels and bent a flange for the back wall metal.
I needed a means to get the sand from the pressure pot to the blast chamber. I had some fittings left over from the soda-blast conversion so I devised a bulkhead fitting the would get the sand where I want it. By passing it through the wall in the center I can use it in either bay. The fitting swivels as it passes through the wall so there will be more flexibility. I used reinforced 1/2" heater hose on the inside of the booth. By loosenng two clamps I can return the blaster nozzle to the tank when I want to use it outdoors. That's not going to happen any time soon as it was -10° yesterday.
I installed a shut off so that I can quickly shut off the blast nozzle if a hose ruptures or comes loose.
Gloves, funnels and back wall metal installed.
Sacrificial mylar sheet. It attaches with double stick tape. Prevents etching tempered glass window. Simple to peel and replace.
It's pretty close to complete. All that's left to do is the grating above the funnels and hooking up the ventilation.
I have a diamond grit hole saw that I use for installing recessed lighting in plaster ceilings. It's 6 3/8" diameter, perfect size for 6" ductwork. The outlet of the fan motor is 4" x 6" or 24 square inches. I'll modify a 6" ductwork boot to transition to 6"round. I picked a position in the 12" thick block wall where I would only have to cut through one of the webs. I drilled a 1/4" pilot hole and drilled until the saw bottomed out.
By adjusting the dampers at the bottom of each funnel there is a significant updraft of fresh air coming through the openings. This updraft carries huge amounts of dust out of the building leaving me with only larger particles of paint and debris to filter out of the media after it falls into retrieval bins below.
The booth is large enough to easily sandblast one of the huge doors off of my Lincoln limo. The beautiful thing about an 8-foot sand blast booth is that I can blast the ends of the doors by simply sliding them over to gain access.
Anyone that has a siphon feed sand blast rig would quickly convert it to pressure feed if they saw how fast rust and paint is stripped off of metal. The only thing left to do is find an appropriate drying system so that moisture doesn't clump up the media.
Total cost, under $500. Ability to blast metal clean without bothering my friends to use their equipment, priceless.


