This is what they look like assembled.
Model A Ford
Ok, so this is going to be an in-depth description of how I repaired the Horn Rod on my 1930 Model A Ford Sport Coupe. If you are not a Model A Ford person with a Horn Rod in need of repair this will probably be BORING. But if you are like me and have a non-functioning horn button, but a working horn on a Model A Ford, this description is going to be GOLD! GOLD I TELL YOU!
 The first thing I did was make sure that my horn actually worked. My
buddy Devin suggested that I just hook the horn straight up to the
battery. I did. It honked. It didn’t have the glorious
AAAHHHWOOOGAAAHH that it was supposed to though, so I took it apart,
cleaned it, put it back together, and adjusted it properly. As much as I
like to think that I am a genius, all this was not intuitive. I
followed the instructions in my Model A Ford Mechanics Handbook.
Since the horn worked by itself my problem was in either the wiring or
the switch. If you know that your horn works, but you only get
intermittent honks when you push the button, you may be able to just
rotate the button around and break loose enough oxidation to get it to
work. If that doesn’t do it, you will need to take the horn rod apart
or replace it.
The first thing I did was make sure that my horn actually worked. My
buddy Devin suggested that I just hook the horn straight up to the
battery. I did. It honked. It didn’t have the glorious
AAAHHHWOOOGAAAHH that it was supposed to though, so I took it apart,
cleaned it, put it back together, and adjusted it properly. As much as I
like to think that I am a genius, all this was not intuitive. I
followed the instructions in my Model A Ford Mechanics Handbook.
Since the horn worked by itself my problem was in either the wiring or
the switch. If you know that your horn works, but you only get
intermittent honks when you push the button, you may be able to just
rotate the button around and break loose enough oxidation to get it to
work. If that doesn’t do it, you will need to take the horn rod apart
or replace it.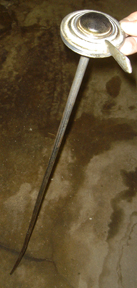 I followed the instructions for removing the Horn Rod in the
Mechanics Handbook, and even though it says that for the Sport Coupe you
have to remove the entire steering column to do it, I found that if I
opened the back window on my ragtop I was just able to squeeze the Horn
Rod out. This is where the instructions in the Mechanic’s Handbook
stop. I thought it would be obvious when I got the thing out how to fix
it, but it wasn’t. It’s not rocket science, but maybe I can save you
some time and effort by sharing what I did.
I followed the instructions for removing the Horn Rod in the
Mechanics Handbook, and even though it says that for the Sport Coupe you
have to remove the entire steering column to do it, I found that if I
opened the back window on my ragtop I was just able to squeeze the Horn
Rod out. This is where the instructions in the Mechanic’s Handbook
stop. I thought it would be obvious when I got the thing out how to fix
it, but it wasn’t. It’s not rocket science, but maybe I can save you
some time and effort by sharing what I did.The Horn Rod is actually a long tube with a wire in it that runs the length of the steering column, has the horn button on one end, and connects to the switch that controls the horn and the lights at the other end. The one on my car is about 46 inches long.
The wire that runs down the center of the rod is one half of the connection and the rod itself is the other half. When you push the button you are connecting the circuit through the rod, the spring, the metal plate in the inside of the button, and the wire that goes back down into the switch at the base of the steering column. The reason that my horn didn’t work is that all the metal parts under the horn button were corroded to the point that there was no electrical connection being made when they touched. Once I got the Horn Rod apart, all I had to do was clean off the oxidation with a wire brush and put it all back together.
I don’t think the Horn Rod was made to be repaired, but you can do it if you are careful. I also don’t know if all Model A Horn Rods are the same, but this is how I got mine apart. On the underside of the button module there are four tabs that are bent over. These tabs are what hold in the bezel that holds the button in place
 Using a shop knife I pried the tabs up to the point where I could get
a needle-nose pliers in to straighten them up to vertical.
Theoretically at this point the bezel should just slip right out, but I
had 75 years of gunk keeping it in place. The only way I could get the
bezel out was to hammer the ends of the tabs while bracing the button
module so that the bezel had room to come out. This was difficult and
took a long time. Partly because I didn’t have the ideal tools for the
job, and partly because there was a lot of old gunk in there that didn’t
want to let go. I think the best way to do this would be with a
non-marring hammer (rawhide, plastic, etc.) and a block of wood with a
hole cut in it that is just large enough to support the module, but
still allow the bezel to push out. Once I had hammered on the tabs to
the point where the ends of them had slid down and were now flush with
the back of the button module, I had to go to the button side and
carefully pry the bezel up the rest of the way with a screwdriver,
trying very hard to not mar the bezel in the process. A plastic or wood
tool would have been a better choice than a screwdriver.
Using a shop knife I pried the tabs up to the point where I could get
a needle-nose pliers in to straighten them up to vertical.
Theoretically at this point the bezel should just slip right out, but I
had 75 years of gunk keeping it in place. The only way I could get the
bezel out was to hammer the ends of the tabs while bracing the button
module so that the bezel had room to come out. This was difficult and
took a long time. Partly because I didn’t have the ideal tools for the
job, and partly because there was a lot of old gunk in there that didn’t
want to let go. I think the best way to do this would be with a
non-marring hammer (rawhide, plastic, etc.) and a block of wood with a
hole cut in it that is just large enough to support the module, but
still allow the bezel to push out. Once I had hammered on the tabs to
the point where the ends of them had slid down and were now flush with
the back of the button module, I had to go to the button side and
carefully pry the bezel up the rest of the way with a screwdriver,
trying very hard to not mar the bezel in the process. A plastic or wood
tool would have been a better choice than a screwdriver.Here are the four parts of the button mechanism after I cleaned them with a wire brush and some polishing compound for the chrome bezel.


What turned out to be the hardest part of this whole project was putting the button assembly back together. I think the easy way would be to use the same imaginary wood block jig that I described earlier, but that’s not how I did it. I used a pair of pliers and a rag. The rag kept me from marring the front of the assembly. First I used needle-nose pliers to tilt the tabs in toward the middle. Then I clamped down with my other pliers, but rather than just squeezing I rocked the pliers forward to bend the tab down into place.


Source: http://www.markhaywardismyhero.com/2006/11/30/how-to-repair-a-horn-rod-on-a-1930-model-a-ford/comment-page-1/
No comments:
Post a Comment