Showing posts with label Engine Rebuild. Show all posts

Sunday, May 14, 2017

Flatheads: Identification Mercury 4" Stroke vs. 3 3/4" Stroke Crankshafts


How To Identify a 4" Mercury Crankshaft


by Bill Boomer, aka 4tford


The intent of this article is to enable you to identify the crankshaft you are looking at as either a Mercury 4" stroke or a Ford 3-3/4" stroke. I will try and describe to you what to do to make a somewhat positive identification and then the pictures can be used to clear up what is foggy.

The 4" stroke crank in North America came in the Mercury vehicles from 1949 to 1953 in the United States and to 1954 in Canada. The Fords were 3-3/4" stroke in both countries.
Because Henry Ford did many different things in many different unexplained ways, the only positive way to identify the crank is to measure the stroke.

If the motor is in the vehicle and you are able to remove a head and rotate the engine, it is a simple matter. Rotate the engine so one piston is at the top of a stroke. Mark the location of the piston and then rotate the same piston to the bottom of its stroke and measure the distance the piston went. If it went 3-3/4" it is Ford and if it went 4" it is Mercury. Another way for a quick check, but not a guaranteed method is to remove the oil pan and measure across the widest part of the thickest counterweight. If the measurement is about 6" it should be Mercury. If it is about 5-1/2" it should be Ford. If the cleanout holes are 5/8" then it should be American made Mercury and I have seen numerous American made Mercury. 

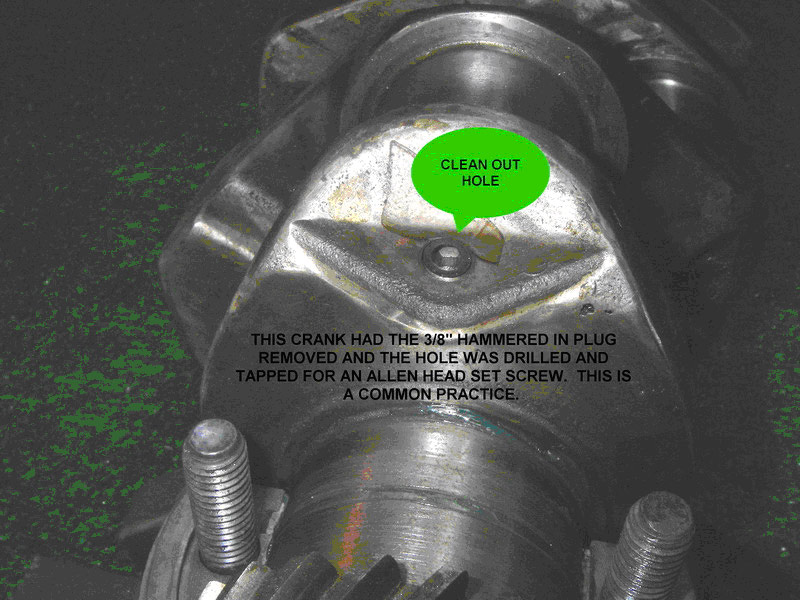
Cranks with a 3/8" clean-out plug. If the letters EAC, 1CM or 0CM they should be Mercury as these are known to be Mercury symbols. I use the word "should" a lot because the only positive method is to measure the actual stroke.

99% of the Canadian made 4" stroke cranks had a 3/8" cleanout as well as an approximately 7/8" long kidney shaped dimple recessed into either one or both of the first thin counterweights. Again, this is not a guarantee but a very strong indicator.
Now on to the pictures. I hope they are self explanatory


Article created by Bill Boomer (4tford) 11/2007

Saturday, January 26, 2013

Ford Model A - Cover for rear camshaft bushing


The rear camshaft bushing is normally open and the cause for oil leaks. It is normally only covered by a gasket between the Engine block and the flywheel housing. If the flywheel housing lays not properly on the engine block, an oil leak is the result. What I did is to close the bushing with a plug. This modification is not my idea, it is published in the book 'The Model A Engine' written by William H. McRee and Paul H. McRee (Page 58/59). In the book they used an existing freeze plug and I have added a blueprint for those who want to make one.
Nockenwellen Deckel
This is the end of the camshaft with the self made plug.
Nockenwellen Deckel
My plug was newly made on a lathe.
Nockenwellen Deckel
This are the blueprints to make your own plug. To get a better view just click here onto blueprint or into the picture.
Nockenwellen Deckel
The camshaft was too long and I had to grind it a little bit until I hat an end play of about 0,5mm between camshaft and freeze plug.
Nockenwellen Deckel
This is how the rear bearing with camshaft inserted looks like.
Nockenwellen Deckel
The freezing plug is a little bit oversized and can be inserted with a hammer. Then make sure that the camshaft does not get in contact on the inner side of the plug. Now you should never see any oil under your flywheel housing.


Ford Model A - Oil hole for rear camshaft bushing


My engine is an early 29er model and has no oil hole at the rear camshaft bushing. In the 'Model A Ford Service Bulletins' is described how you can add this hole correctly. This is a modification which was done also by Ford in former times.
This is the hole where oil can run from the valve chamber directly into the rear bushing.
To get a hole at the right position I used an old bolt and filed a notch on one side. All details are described in the book mentioned above.
The notch acts as a guidance for my long drill to make the hole with the right angle.


Source:  http://www.maurer-markus.ch/ford_a/mod_nockenwellenlager.en.html