Showing posts with label Ignition. Show all posts

Tuesday, April 10, 2018

6 Volt Optima Battery for Model A Ford


Optima 6 volt battery sealed in Ford licensed case. The case is the stock size to fit in original location. The battery has 800 C.C.A. The batteries are made to order and shipped direct from the manufacturer. Expect a 2-3 week delivery time. These batteries have a 4 year limited warranty with a 1 year replacement on the Optima battery. The warranty is handled by the manufacturer of the battery. Battiers picked up at the store have to pay the shipping cost to the store. Logo on the side of the battery is NOT painted as pictured in the sample photo above.

Source: https://cgfordparts.com/ufolder/fordpart.php?number=OPT-2HF

Thursday, June 19, 2014

Adjusting the Mallory Model A Distributor YL11A2

this is part of a conversation i followed over at the Fordbarn.com regarding Mallory YL11A2 Distributors...


Setting the timing with a Mallory distributor is fairly easy.. The easiest way is when the timing pin drops in place, where ever the rotor tip is pointing will be number one time. The distributor can easily be rotated as in modern cars and set the plug wires as needed. The firing order is 1243 . I tune mine by ear, some buy a kit and use a timing light . I set mine as advanced as I can without starter kickback when cranking and no timing knocks. A little tweaking or rotating as needed with the timing will get er done, works for me. Usually the rotor tip ends up pointing where number 4 would normally be. If you want number one timing to be where it would be with the model A distributor , it will be more complicated. You will need to remove the valve cover and the oil pump and distributor drive assembly. With the drive assembly removed, you can stick a long straight blade screwdriver down through the head and down to the oil pump and turn the pump as needed for the drive assembly to align as necessary for the rotor to align as wanted. The points cam isn't adjustable on the Mallory distributors.

The only part that I have ever needed with my Mallory distributors was the condenser. I am using Ford V8 condensers with mine., the same condenser used with the so called modern points that the model A venders sell.. Bubbas ignition has Mallory parts but I don't have an address or phone number.

I got my first Mallory distributor from Harrys model A parts in Oregon in the early 90s . Harry told me that They had run these distributors for over 30.000 miles without having to do anything. Mine have been trouble free. This is the distributor that was used in the dyno tests with the Brumfield heads back in the ninties. The dual point Mallory was shown to give horsepower increases at low to mid RPM range. I had installed float-A-motor mounts in the coupe and there was quiet a bit of cl;utch chatter when taking off. After installing the Mallory distributor, the chatter went away completely. I was talking to Ken Miller and he felt that the Mallory distributor advanced so smoothly that it removed the chatter. Just an example of the smoothness of the advance. 


Mallory 24895 Condenser for YL 11A2 Distributor


Tuesday, May 21, 2013

Ignition Basics


Inspection:
When moving the Spark Advance Lever inside the cab, all the way up and/or all the way down, the spark retard arm on the distributor should not make contact with the Upper Distributor Body on either side.

The fix: For the 29-31 two tooth steering, loosen both steering column clamps. One is inside the cab and the other is under the hood. Rotate the steering column until the arm functions properly. Tighten the clamps.
Inspect the Distributor Shaft.
The Distributor Shaft should not rock back and forth. If it does rock, it is time to replace the bushings.


Slight rotational play is ok.


Setting Rotor/Distributor Contact Gap
Put on parking brake, place gear shift lever in neutral position, and use the Hand Crank to rotate the rotor.
Check the rotor at all four distributor contact points. The gap should be .025
 
The fix: Bend the Rotor and/or file the contacts on the Distributor Housing.

Setting Point Gap
To adjust points proceed as follows:
1. Lift off distributor cap, rotor, and body. Turn engine over slowly with hand crank until breaker arm rests on one of the lobes of the cam with the breaker points fully opened.
2. Loosen lock screw and turn the contact screw until the gap is between .018 and .022”. A standard thickness gage is used to obtain this measurement. When correct adjustment is obtained, tighten the lock screw. After tightening the lock screw, again check the gap to make sure the adjustment was not altered when the lock screw was tightened.
3. Replace distributor body, rotor and cap or proceed to ignition timing.
Ignition Timing:
1. Inspect the Distributor as stated above.
2. Put on parking brake
3. Place gear shift lever in neutral position
4. Fully retard spark lever.
5. If not previously done, remove the distributor cover and lift off rotor and distributor body.
6. Check Point Gap. If necessary adjust them as previously described above.

7. Screw out timing pin located in timing gear cover and insert opposite end of pin into opening.
8. Find Top Dead Center. With the hand crank, turn the engine over slowly, at the same time pressing in firmly on the timing pin. When piston # 1 reaches the end of the stroke (top), the timing pin will slip into a small recess in the cam gear.
Tip: If the engine had been running recently, the timing pin should drop into the recess when the rotor is about to line up with contact #1 on the distributor cap.
Note: While hand cranking to find the timing mark mark, occasionally pause to relieve the compression pressure.
Note: If the timing mark is missed it is two revolutions, with the hand crank to return to the previous point.
Note: By removing Plug # 1 and shining a small flash light into the hole, it is possible to see the top of the piston when you are at Top Dead Center.
Note: By removing all the plugs, the compression is eliminated and the engine is easier to hand crank.
9.Remove the cap and rotor. Loosen cam locking screw until the cam can be turned. Note: A cam wrench can be purchased from one of the Model A venders, makes the job easier.
10. Replace rotor and/or use the cam wrench to turn and line up the notch in the cam with the No1 contact point on distributor head.
11. Remove rotor and/or wrench from cam and using your fingers slightly turn the cam in a counter clockwise direction, until the breaker points are fully opened.
12.Slowly turn the cam back in a clockwise direction until the points just close.

13. Lock the cam by securely tightening the cam locking screw. This method removes the backlash in the distributor shaft from affecting the timing.
14.Turn on the ignition and with your fingers twist the cam counter clockwise. With the slightest movement the points should spark. If it does not spark retime.
Final check with the ignition on pull the spark advance lever down one or two notches and listen and/or have someone watch for a spark from the points. If the lever moves more then three notches retime.
Replace timing pin and put away crank
Oil the distributor and Apply Vaseline to the cam.
15. Reassemble distributor housing, rotor, and cap

Model A's are positive ground. The Model A frame acts as the positive ground wire from the battery
The Primary Circuit.
The primary circuit is the low voltage circuit that controls the ignition system.
  • Battery - provides the power to run the system.
  • Ammeter - Used to measure the current flow.
  • Ignition Switch - allows the driver to turn the system on and off.
  • Points - a mechanical switch that acts as the triggering mechanism to break the circuit to collapse the magnetic field in the coil.
  • Condenser - provides a false ground and protects the points from burning out.
  • Primary Coil - produces the magnetic field which collapses and creates the high voltage in the secondary coil.
  • Wires - join all the components together.
  • Model A Frame - acts as the positive wire used for ground.
The Secondary Circuit
The Secondary Circuit is the high voltage side of the ignition system. The voltage is generated when the magnetic field collapses in the primary windings.
  • Secondary Coil -Creates a high voltage when enacted upon by the collapsing of a magnetic field in the primary coil.
  • .Coil Wire - a highly insulated wire, that takes the high voltage from the coil, to the distributor cap.
  • Distributor Cap - a plastic cap with an electrode to distribute the electricity to the rotor.
  • Rotor - spins around on the top of the distributor shaft, and distributes the spark to the right spark plug.
  • Plug Connectors- metal strip that takes the high voltage from the cap to the plugs.
  • Spark Plugs - Highly insulated electrode that forces electricity to arc across a gap in order to ignite a fuel air mixture in a combustion chamber of an engine.
Primary and Secondary System
The ignition switch allows the driver to turn the system on and off. Turning the key to the on position closes the circuit and allows current to flow. As current flows around the primary coil, a magnetic field is created. The strength of the magnetic field is determined by how long the points are closed.
The points act as a mechanical switch that is controlled by the distributor's cam. When the points open, the circuit is broken; this instantly collapses the magnetic field and induces a high voltage into the secondary windings. The voltage is so intense that in its path to ground, it is able to ionize the air gap of the spark plug, thus igniting the fuel air mixture in the combustion chamber.
How The Condenser Works
The function of a condenser is to provide a false ground. When the points open and the magnetic field collapses in the coil. A high voltage is created in both the primary and secondary windings. The voltage in the secondary windings heads towards the spark plugs to ignite the fuel; while the new induced voltage in the Primary windings searches for ground. The voltage created by the collapsing of the magnetic field in the primary coil is strong enough to jump the gap between the points in the distributor as they open, but instead, the current is attracted to the condenser, where it is collected and stored to assist in the next cycle of creating a magnetic field in the Primary Coil.
Note: At one time the condenser was considered the weak link in the system and failed often. Today's reproduction condensers do not fail like their predecessors and are quite reliable.

Tom Wesenberg Tip:
"Condensers are very easy and quick to change if you follow these steps exactly.
1. Have the new condenser lying next to the distributor.
2. From the passenger side, remove the ground screw FIRST.
3. From the driver’s side remove the condenser terminal screw and be sure to keep light pressure on the screw while you slip out the old condenser and slip in the new one.
4. Tighten the terminal screw, then go to the passenger side and tighten the ground screw.
Always set the points to .020” first, then set the timing. Remember that the points setting can affect the timing, but the timing can’t affect the points setting. Be sure to have lube on the points rubbing block. I always carry a small piece of sandpaper in my billfold just in case I need to clean points, or check an engine number at a swap meet, etc. A points file is good to keep in your car’s tool kit and only costs about a dollar."

How The Coil Works
The coil itself does not care which way it is hooked up, it will be just as efficient either way. On the other hand the spark plugs do care. They prefer the center electrode to be negative and the end electrode to be positive. The reason is electrons like to jump from a cold surface to a hot surface and the center electrode of a spark plug is hotter than the end electrode. By correctly establishing the coil’s polarity the voltage required to jump the spark plug gap is 15 to 30 percent stronger which may or may not be evident on the performance of your ‘A’ depending on the condition of the ignition components. Oddly enough the large amount of voltage created by the coil is not affected, positively or negatively, by the mere 6 volts (or 12) of the battery. Therefore; positive ground or negative ground of the battery is not relevant.
Tom Wesenberg Tip:
"To check coil polarity hold a pencil lead in the spark path with the plug wire about a third of an inch away from the distributor terminal. You’ll see a FLARE on one side of the pencil lead and this flare should be on the spark plug side of the lead." Tom suggests to hold the pencil in the middle or even slide the pencil into a plastic tube to avoid an electrical shock.
If the flare is on the plug wire side. Switch the two wires on the coil.
Restoration Tips by Tom Endy
Distributor Techniques
Numerous articles have been written concerning the rebuilding of the Model A Ford distributor. Just about any one of them will get you through the rebuilding process. The intent of this article is to provide some tips to help you do the job better.
Distributor Roadside Seminar
On any long club tour sooner or later one of the Model A's will pull over to the side of the road and up will come the hood. The first component to be attacked is the distributor, and it is probably the most likely source of the problem..
Model A Ford Ignition Diagnostic
Ammeter "Jiggle"... A wealth of knowledge:
The Ammeter
The ammeter in a Model A Ford can be a very useful tool in a variety of situations that will signal to the driver the car’s electrical status.


 Source:  http://modelabasics.com/Ignition.htm

Ignition Trouble Shooting


The Following are MAFCA Starting Points to help you diagnose Model A ignition circuit problems...

Check the Following:
Here are the checks to make:

  • Yellow wire connected from post on starter switch to terminal box post (post on passenger side of terminal box).
  • Ammeter (-) side connects to passenger side post on terminal box.
  • Ammeter (+) side connects to driver side post on terminal box.
  • Black wire connects from driver side post on terminal box to coil (-) terminal.
  • Red wire connects from coil (+) terminal to ignition switch.
  • Yellow/Black wire also connects from driver side terminal box post to the cut out terminal. That completes the ignition wiring except for the ignition cable and distributor plate.
  • Here is a voltage check of the circuit:
  • Connect the (+) side of your volt meter to a good ground point on the engine or frame.
  • Touch the (-) probe to the passenger side terminal box wing nut. Read 6 volts.
  • Touch the probe to the driver side terminal box wing nut. Read 6 volts.
  • Touch the probe to the (-) terminal on coil. Read 6 volts.
  • Touch the probe to the (+) terminal on coil. Read 6 volts.
  • Place a piece of paper between the point contacts.
  • NOW TURN IGNITION KEY ON.
  • Touch the probe to the end of the points arm, read 6 volts.
  • Remove paper between points. Open and close points and look for spark each time points open, (no spark means bad condenser, replace condenser).
  • If points are sparking then disconnect the coil center (high tension wire) from the distributor cap (leave connected at distributor end). Place the free end of the coil wire about 1/8" from one of the engine head nuts. Crank the engine over with the ignition key on. There should be a bright blue arc from the coil wire to the nut (ground point). No arc means bad coil.

Friday, April 12, 2013

TECH: How to convert a mallory YL dual points distributor to electronic

this is a thread from over on jalopyjournal.com that i thought i would file for later...i just got an NOS Mallory YL Ignition Distributor from my friend Earl Reynolds...with NOS ignition wires....

Hello tom here.... Thought id share some pictures I took while converting the distributor....its pretty damn easy too.

First things first get yourself a good useable mallory dual point distributor... Next order your self a petronix ignitor conversion kit pictures below... About 80 dollhairs


Then select the tools you'll need for the job


Then grab your distributor and inspect it...


Then gently remove all the old dual points crapolla inside... Remember be gentle


Once you have all that shiznit out you can install the petronix igntor and pull the writes through the existing hole


ThenYou get the the supplied cup and press it on


Then get your rotor and press that in, there is a spacer if you need it... I actually don't have the right one but just put it on for reference


Then reinstall the cap and your done


If I can do it anyone can... Hope this helps

Tom
__________________
my 31 ford tudor V

http://www.jalopyjournal.com/forum/s...d.php?t=369296

COME ON 49ers!!!!

Last edited by tomcantdoit; 06-26-2011 at 10:10 PM.


http://www.jalopyjournal.com/forum/showthread.php?t=602518

Monday, January 21, 2013

Ignition Coil and Polarity


Ignition Coil & Polarity

(THIS MEMO COMES FROM BOB BIDONDE)
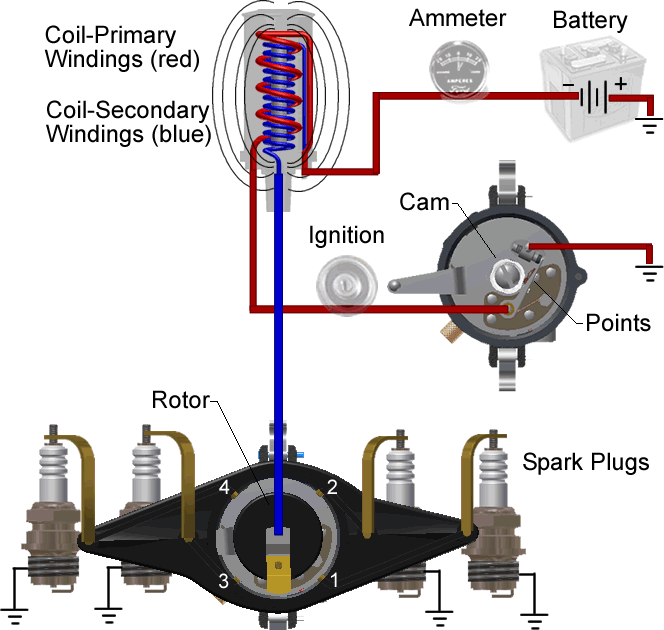
Ignition Coil Hookup Connections
 
    The Ignition Coil does not change the direction of current flow, hence it does not change polarity. However, there are more coils in the Secondary Winding inside of the Coil, thus there is more resistance to incoming current flow at the Secondary Winding Terminal, so the Coil's high voltage output to the spark plugs will be less if the Battery is inadvertently connected to the Secondary Winding Terminal. By the way, the higher resistance wastes primary current in the form of heat, and the Coil will run hotter if the Battery (current-in) is connected to the Secondary Terminal instead of the Primary Terminal. Heat reduces coil life!
 
    So now that we know the Primary Terminal on the Ignition Coil is where we want to connect the battery wire, two questions arise to get the connection right in the Model A: (1) Which is the Primary Terminal on the coil? (2) Which is the correct wire from the Battery that connects to the Primary Terminal?
    (1) Using an ohmmeter with one lead in the high voltage output socket, measure the DC resistance at each wire terminal. Connect the Battery wire to terminal with the least resistance to get the highest secondary voltage output to the spark plugs;
    (2) Assuming that the Model A has a 6-volt system wired in accordance with the factory diagram, the BLACK wire from the driver's side of the Terminal Box is the correct wire. If your Model A has non-factory wiring, then find the wire coming from the CHARGE side of the Ammeter and trace it down to the Terminal Box stud. Connect this stud to the Primary Terminal of the Coil.
 
    Do not rely on the markings that may be cast into the coil top at the terminals, and here's why. Before 1955, coils were marked  (-) or BAT at the Primary Winding Terminal, and (+) at the Secondary Winding Terminal because the ignitions of the time were 6-volt (+) ground. By 1956, ignitions went to 12-volts (-) ground, so the Primary Terminal was marked (+) or BAT. So you can see the coil markings may cause you to make the wrong connections for a pre-1956 Ford.
 
    If you find the above confusing, here is a much simpler solution. Buy from your local Model A parts supplier, a gizmo known as a "Ignition Spark & Coil Tester." It costs in the ballpark of $25, and it has lights to indicate if the wiring is right or wrong. This gizmo will earn its price back in gasoline mileage and performance.
 
    Most all coils, 6 and 12-volt alike, for breaker point ignitions are (the same) designed for 6 to 8-volt operation. Note the resistance wire in the figure. In a 12-volt ignition system, the ignition switch has 2 run positions. The START position allows 12 volts into the Primary Coil to get a hot shot high-voltage engine start. When you release the key to the RUN position, the resistance wire is cut into the primary circuit to drop the coil voltage to 6 to 8 volts. The heat from a constant 12-volt input will shorten the life of a breaker point ignition coil.
 
    When converting from 6 to 12-volt operation, you can run a reproduction "Ford" script 6-volt Coil with an external resistor so the Coil operates at 6 to 8 volts. You can also run a 12-volt Coil with an external resistor. However, some 12-volt coils have an internal resistor, and you need to know this to avoid having 2 resistors on the Primary side of the Coil.
 
    Running an antique ignition coil is fool hardy because eventually coils breakdown and cease to function without warning. Do not run an original antique coil in a 12-volt conversion because these old coils will not take the stress of 8 to 12 volts. And "Oh by the way," make sure that the brass terminal ends are soldered to the conductor of the high-voltage wire between the coil and the distributor. Keep the Primary wire connections bright & tight, and the plastic parts of the coil and distributor clean.
 
Bob Bidonde 
 
Coil